19 Mar Disabling automatic kernel starts in SageMaker Studio
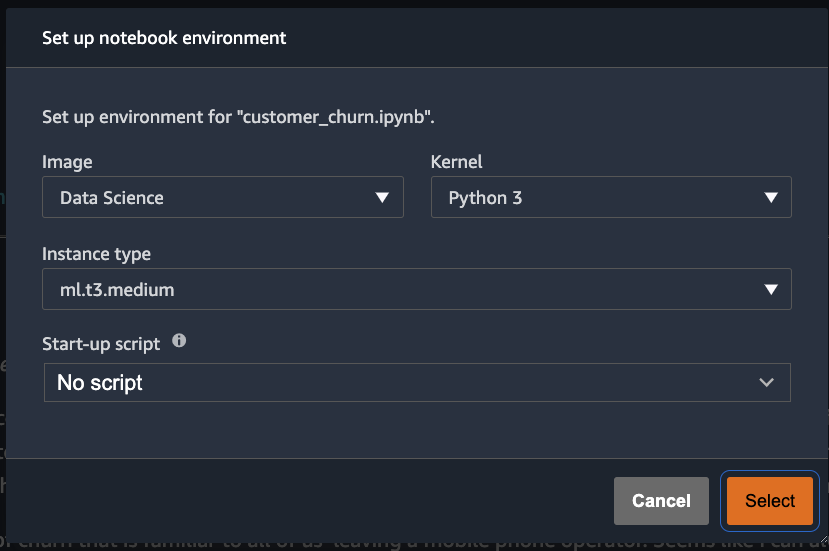
The default behaviour in SageMaker Studio is for it to start a kernel whenever you open an existing notebook that has been assigned a kernel before.
In my discussions with customers, I have been asked several times how one could modify this behaviour. Automatic kernel starts cannot be cancelled as the kernel is being spun up, hence the SageMaker Studio user has to wait for the kernel to be provisioned. This can be time consuming and cost ineffective for very big instance types.
In the following post, I will explain how this behaviour can be tweaked.
Diving deep into the Jupyter Lab configuration for a solution
Looking at the Jupyter Lab 2.0 API documentation, there should be a notebook_starts_kernel flag that can be set to false in order to disable automatic starts. However, SageMaker Studio uses version 3.0 of Jupyter Lab.
According to this GitHub issue, the configuration flag is now in the page config. This change has been merged into JupyterLab 3.3.x in March 2022.
The use of page_config.json for setting options is documented here, so let us try implementing it on a SageMaker Studio environment.
Testing the solution manually
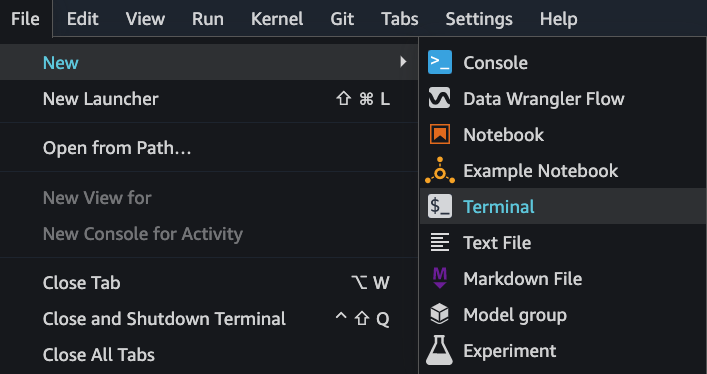
1. Log into your SageMaker Studio user and start a new Terminal session:

2. Check your Jupyter Lab version. As mentioned, this will only work for version 3.3.x and up. Below is my terminal output as an example:
|
1 2 3 4 5 6 7 8 9 10 11 12 13 14 15 16 |
sagemaker-user@studio$ conda activate studio (studio) sagemaker-user@studio$ jupyter --version Selected Jupyter core packages... IPython : 8.1.1 ipykernel : 6.9.2 ipywidgets : 7.7.0 jupyter_client : 7.1.2 jupyter_core : 4.9.2 jupyter_server : 2.0.0rc3 jupyterlab : 3.6.0a1 nbclient : 0.5.13 nbconvert : 6.5.3 nbformat : 5.3.0 notebook : 6.4.10 qtconsole : not installed traitlets : 5.2.2o |
You can see that I have version 3.6.0a1 of Jupyter Lab. If you find yourself stuck on an old version of SageMaker Studio with Jupyter Lab version 1.x.x, please upgrade to version 3.x.x by following this blog post.
3. Check where Jupyter Lab reads its configuration from:
|
1 2 3 4 5 6 |
(studio) sagemaker-user@studio$ jupyter --path config: /home/sagemaker-user/.jupyter /opt/conda/envs/studio/etc/jupyter /usr/local/etc/jupyter /etc/jupyters |
The configuration paths are listed in order of priority. Which means that Jupyter Lab will first look for configuration files in the hidden .jupyter folder in the home directory of the SageMaker Studio user. The final configuration is a merge of all configuration files encountered in the paths.
4. Create the page_config.json file:
|
1 2 3 4 |
(studio) sagemaker-user@studio$ mkdir /home/sagemaker-user/.jupyter/labconfig (studio) sagemaker-user@studio$ touch /home/sagemaker-user/.jupyter/labconfig/page_config.json (studio) sagemaker-user@studio$ echo {\"notebookStartsKernel\": false} > /home/sagemaker-user/.jupyter/labconfig/page_config.json |
5. Shut down the Jupyter Lab Server by going to File>Shut Down. Then launch the server again.
SageMaker Studio would now ask for a kernel every time you open a notebook, instead of automatically starting the kernel:

Automating the solution
Because the configuration resides on the EFS shared drive, it will be picked up every time you stop and restart the Jupyter Lab server.
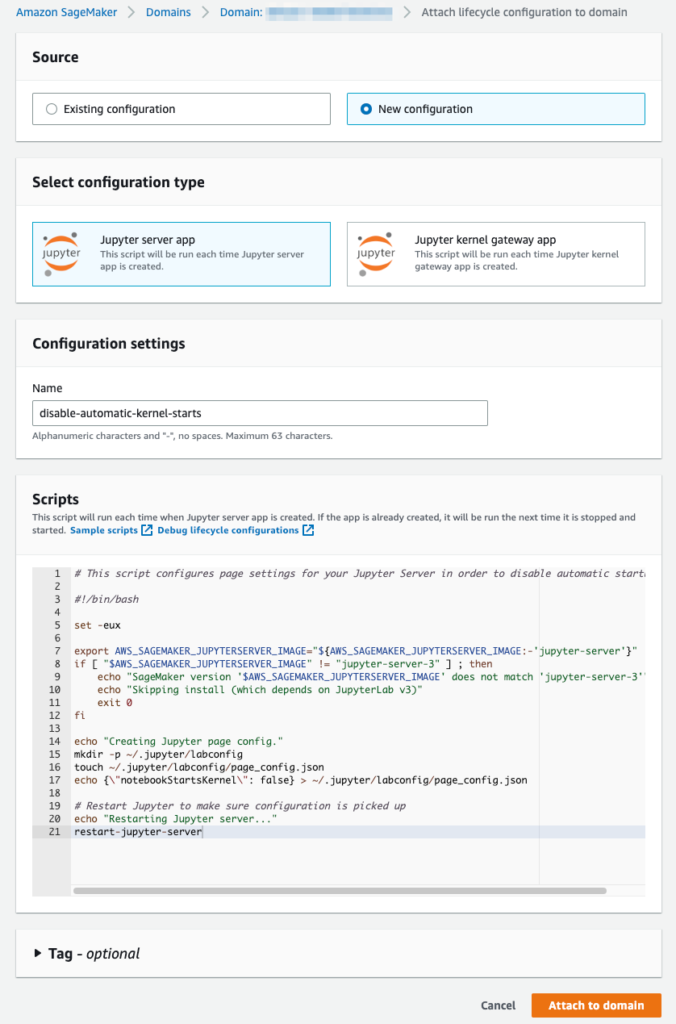
In case you want to have this applied automatically to all users in a SageMaker domain, you can also create a lifecycle configuration script as shown below:
1. On your SageMaker domain page, access the Lifecycle configurations tab and click Attach.

2. Create a new configuration.
For Configuration Type choose Jupyter server app. Give the configuration a suitable name and then copy-paste the script in the Scripts section.

Here is the script for easy copy-pasting:
|
1 2 3 4 5 6 7 8 9 10 11 12 13 14 15 16 17 18 19 20 21 22 23 24 25 |
# This script configures page settings for your Jupyter Server in order to disable automatic startup of kernels on notebook access #!/bin/bash set -eux export AWS_SAGEMAKER_JUPYTERSERVER_IMAGE="${AWS_SAGEMAKER_JUPYTERSERVER_IMAGE:-'jupyter-server'}" if [ "$AWS_SAGEMAKER_JUPYTERSERVER_IMAGE" != "jupyter-server-3" ] ; then echo "SageMaker version '$AWS_SAGEMAKER_JUPYTERSERVER_IMAGE' does not match 'jupyter-server-3'" echo "Skipping install (which depends on JupyterLab v3)" exit 0 fi echo "Creating Jupyter page config." mkdir -p ~/.jupyter/labconfig touch ~/.jupyter/labconfig/page_config.json echo {\"notebookStartsKernel\": false} > ~/.jupyter/labconfig/page_config.json # Restart Jupyter to make sure configuration is picked up echo "Restarting Jupyter server..." restart-jupyter-server. |
The script is also available on GitHub. I have made a pull request to the official aws-samples repository for lifecycle config examples:
3. Select the created lifecycle configuration script and click Set as default to have it run on the creation of new users.

Note: the lifecycle configuration can also be enabled on individual users, instead of the whole domain.
Reverting back to the original behaviour
If you want to revert back to the original behaviour of the notebooks, you should do the following:
- if you have enabled the automation, detach the lifecycle configuration script from the SageMaker Studio domain
- delete the configuration file from the home directories of the existing users and restart their Jupyter Lab servers
In this post you have seen how to disable automatic kernel starts on notebook opening inside SageMaker Studio. I have shown both a manual and automated way to do it, as well as explained how to revert back to the original behaviour. Let me know in the comments section if this solution was useful to you.


No Comments